Thursday, December 31, 2009

Full Moon, Christmas Lights and Mobile Homes

I decided to catch a few Christmas light pictures before the season ends and the full moon is a bonus. These pictures were taken before it was completely dark, trying to catch some blue sky and clouds to contrast the lights. The moon is a bit overexposed in these shots which can be remedied by merging lower exposed shots I took from the same position, in other words, HDR. These are out of the camera with a little tweeking in LightRoom.

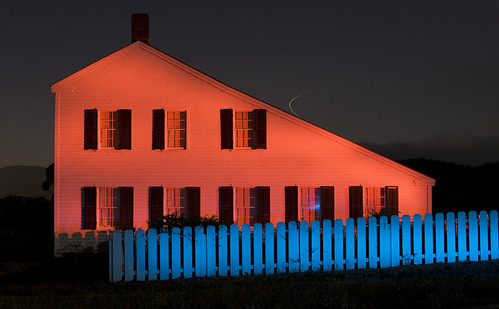
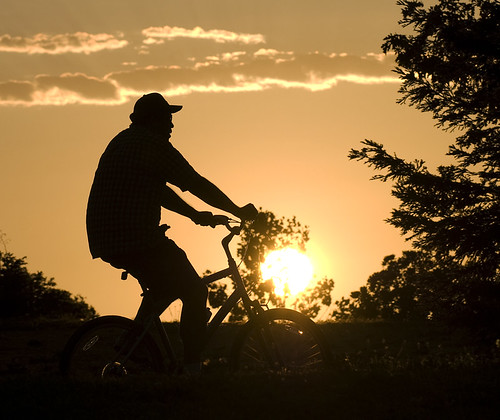
In addition to visible sky, I like the colors, the tree silhouettes and the reflections in the automoibles and water in the street.


Thursday, December 24, 2009

Bay Taper dot Com

Just a quick update to suggest you checkout a bay area photographer, videographer and sound recorder specializing in "the San Francisco Live Jazz & Creative Music Scene". I aspire to his dedication quality work and talent.

BayTaper.com

Have a fine holiday!

Wednesday, November 25, 2009

Pumpkin Pie Stop Action Animation

I took over 1100 pictures of Lori making a pumpkin pie and created a stop action animation using the humble Windows Movie Maker. It turns out that neither of my Windows machines are powerful enough for Photoshop to convert that many RAW files in one action or Windows Movie Maker to render them into a video larger then for an iPod.

I overcame that problem by converting half of the RAW files at a time to 720x480 jpgs, compressing them down to 5. In order to create an AVI file in Movie Maker, I had to create 12 different videos of 100 pictures each and then combine them to make one complete video. For posting on SmugMug, I then saved the video in another smaller format.

Looking back, I could have shot the original pictures in jpeg at the correct resolution saving a big step. And I need to figure out the best format to save it for the web. Still working these things out.

It's not too bad. Click the picture below and check it out. And then read my own critical review below.


More thoughts: I learned a few things here, after repeated viewings.

1 - I observe the exposure changing nearly every frame, as Lori moves her arms in and out of the picture. The cause? I used aperture priority mode. As things move around, especially the black sleeves of Lori's shirt, the "correct" exposure changes and the camera adjusts the shutter speed. While her arms are now correctly exposed a change can be seen in surrounding areas such as in the wooden cabinets.

Once I determined the best exposure setting, I should have worked in manual mode which will lock those settings in. Do not change them! Determining that correct exposure is the trick. Using manual mode, chances are not every scene will be perfectly exposed, (ie; the black shirt moving in and out of the picture and moving to various scenes within the kitchen). You need to experiment and find the settings that balance exposure for the whole of the animation.

2 - I also see the focal length changing, or at least appears to change. Watch the edges of the video as they disappear and reappear. My guess is the autofocus is adjusting as arms and items move around the frame. The solution again is to set the best focus for the scene and turn off the automatic focus. I need to verify this with the next animation.

3 - The color and brightness are dull. I filmed this at night under a mix of incandescent and full spectrum fluorescent lighting. I set the white balance to incandescent and did not use a white or grey card. I thought the colors looked pretty accurate.

Maybe what this needed was more light. A faster lens would help too, enabling faster shutter speeds. It would also allow a smaller aperture and a greater depth of field, bringing more into focus.

To summarize what I have learned, consider using manual exposure settings and turn autofocus off. Bring in more light then you think you need, especially to compensate for low light lenses you may not own. If the project is important, rent the equipment you need. Learn to use the software and know the capability of your computer.

For software, I may look into Adobe Premier Elements. Similar to Photoshop Elements, it appears that Premier Elements provides all the basic tools needed to create and edit video for about a 1/5 of the price of the full blown program.

Sunday, November 22, 2009

Foothill College Contemporary Big Band

The contemporary big band program at Foothill Community College appears to be ending it's long run, falling victim to the sad economy. Under the baton of John Gove, the bands attracted many of the bay area's first call players as well as providing a friendly environment for up and coming students. Contemporary music was the key. From Jim McNeely to Maria Schneider to Thad Jones to obsure Duke Ellington pieces and also local composers such as Ray Brown. I listened to my wife Lori practice the most bizarre trombone and piano parts and picked up quite an education by proxy. While others recorded their end of semester concerts, I started taking pictures and have put together a collection. Click here or any of the pictures below to go to the full gallery.


Tuesday, November 17, 2009

Open PPGBA Meeting this Thursday


I just recently learned of the Professional Photographers of the Greater Bay Area which appears to be another valuable resource for picture snappers, especially in the San Francisco bay area.

They are holding their annual "Sustaining Members" meeting Thursday, November 19, free and open to everyone. Guest speaker Ed Pingol will discuss lighting. There will also be several photo labs and other vendors showing their wares.

Click here for more details.

Friday, November 13, 2009

Great Horned Owls


Birds are great subjects. They are plentiful and colorful. They are fleeting which make still pictures of them challenging and all the more appreciated. A friend recently showed me a picture of a great horned owl taken just a short walk from my home and I realized I needed owl pictures of my own.

2 owls live in the eucalyptus grove right down the street. I can hear them hooting as I type this. They do not seem much afraid of us and often sit rather close to an accessable path. They also sit very still. This is an advantage as I am shooting them in late evening light and in deep shadows. With the aperture wide open, I am using 1/10th of a second or slower shutter speed.


According to Wikipedia, we have a male and female. The male being the smaller of the two and with a lower pitched song. All the hooting may be courtship rituals in progress. If so, they would build a nest and little owls would appear in the early spring. All in all, an excellent photo documentary opportunity and blog worthy too.

If I am correct, in the pictures above, the first is the male. The second, the female, is not winking at me. She appears to have lost her right eye.

I will be photographing them as often as I am able. I am using a Nikon D80 with a Nikkor 70-300 4.8/5.6 lens usually cranked out to 300mm and still requiring some extreme cropping. Using a tripod and remote trigger helps. Focusing through the branches is another challenge. I hope to score some great shots going forward and posting them here.

Great Horned Owl

This was my first shot and hand held at that! He was sitting in a great location.

Tuesday, October 20, 2009

Worlds Collide Concert Pictures

From a core group of musicians, 3 unique performances emerge. "Worlds Collide" at the Little Fox Theater this past Sunday evening was a journey through the minds of the Murray Low Trio, the Aaron Lington Quintet and John Worley with Bari Bari. We often experience these musicians while following our friend John Worley's gigs but he was more the side man for this show, providing us the exposure we rarely make the effort to see. And the icing on the cake was the opportunity to photograph everything from the balcony of the theater.

Clicking any of the pictures below will take you to the full photo gallery.


Tuesday, October 13, 2009

Backyard Bird Photography

In order to improve my skill sets for action photography, I took on the project of shooting birds in flight. Our backyard feeder attracts a large amount of colorful finches who do not seem to have a great fear of my presence, at least when I am sitting still. I take advantage of this virtually free opportunity and spend hours sitting, observing and photographing these creatures.

I have written my experience up as a tutorial (with some of my favorite pictures) and posted it to the Instructables web site. Instructables is a fun Do-it-yourself site with content entirely provided by the members. It is free to view and, if you would like to contribute, free to join.

My tutorial is entitled "Backyard Bird Photography" and clicking here will take you there.

This tutorial is also entered in thier Digital Photography Contest, so..., if you are a member of Instructables and are so inclined, you have my permission to vote for me.

Update: The tutorial picked up one of 5 first prizes, a weekend photography workshop put on by Popular Photography magazine. I know I need it and I guess the judges thought so too.

Fall colors

Saturday, September 19, 2009

Filters

It is time I learned a lot more about on camera filters. Filters, by definition remove something from that which they are filtering. Camera filters remove somthing from the light entering your camera, maybe a color or the amount of light or blocking light coming from specific directions. I felt the need to get me some of these filters and the more I researched, the more products available (at many different prices) and the more information I found.

One good (online and free) primer that explains filter basics and then goes on to give brief descriptions of 2 dozen common filters and how they can compliment your photography can be found at:
http://www.digicamera.com/features/filterprimer/index.html

One way to narrow the choices is to think about what effects you are aiming for or consider a problem you just can't seem to overcome with the camera as is. I am looking to soften moving water in bright light and also reduce glare from shiny surfaces. From my reading, a neutral density (ND) filter should help with the former. It appears to block all colors equally hence blocking just the amount of light entering the camera. For the latter, a polarizing filter, specifically a circular polarizing filter sounds about right.

So an ND and a circular polarizing filter sound like a good start for my needs. Now, to determine which brand and quality to pony up for. People like Scott Bourne suggest bying the best, especially if you have expensive lenses. "Why put a cheap filter on an expensive lens?" He and Rick Sammon often comment about filters on their podcasts which can be found at http://photofocus.com/.

One last interesting fact is that no professional photographers seem to recommend a plain or UV filter just to protect the front of your lens as any extra glass will degrade your picture. Since I need all the help I can get, there are no UV filters on my cameras.

So, I will update this entry when I decide and buy some filters. More to come!

Wednesday, September 16, 2009

First Stop Action Animation Video

This blog is all about learning photography and I have no problem showing "first attempts" even though I feel it is not my best work.

I took a series of about 200 pictures from a hill above the Reno Balloon Race and created a stop action video of the mass ascension. Click on the picture to go to the video.


Using Photoshop I created an action that adjusted levels, brightened, added contrast and resized the 200 pictures. I then imported them into Windows Movie Maker, configured a few things like setting each frame to display for 1/8 of a second and I experimented with several different quality settings. The Windows program was very easy to work with and is free as opposed to buying and learning Premiere. I have not looked at other video programs.

One improvement for this video would be to not move the camera between shots. The jumpiness is a bit annoying. The exposure changes too. I believe I left the mode at aperture priority as the sun was going in and out due to the clouds and it gets a little dark at the end. Setting the exposure and using manual might have helped. Not every frame is in focus either, at least in the beginning. I noticed that the auto focus changed as the balloons moved. After a few frames, I focused and then turned off the AF.

Another helpful hint would be to set the camera to take the pictures at a specific frequency. I had rented a D90 and could not easily figure this out when I needed to. I took the shots manually, counting to 10 when not much was happening and more frequent when the balloons were rising.

And there is no music! Maybe Yakkity Sax would fit.

All in all, it was a fun project that can still be improved on. And the lessons learned are most important!

Update: I neglected to include a useful web tutorial on stop action animation that was a big help to getting started:
http://www.wikihow.com/Create-a-Stop-Motion-Animation

Monday, September 14, 2009

The Great Reno Balloon Race 2009

We just returned from 3 days at the Reno Balloon Race with nearly 3000 pictures and a few dozen videos. The question is this: what are the most efficient work flow solutions for reviewing, editing and posting the best pictures? I think that will be the subject of my next blog post. In the meantime, here are a few choice pixs. Click any see to the larger versions.

For more hot air balloons, my Flickr gallery is here and Lori's gallery is here.

Dawn Patrol

To the Moon

balloons for days

Thursday, September 10, 2009

Light Painting the Johnston House

While searching for a light painting opportunity last weekend during the full moon, I noticed that the Johnston House in Half Moon Bay sat dark on it's hill. The house is normally lit by an intense white light and stands out clearly while driving highway 1 through town. Large and white, I took the opportunity to jazz it up a bit with a new spot light I recently purchased.

The Johnston House and the Full Moon

Monday, September 7, 2009

Low Key Lighting

What I learned today: a definition of low key lighting.

From Wikipedia:

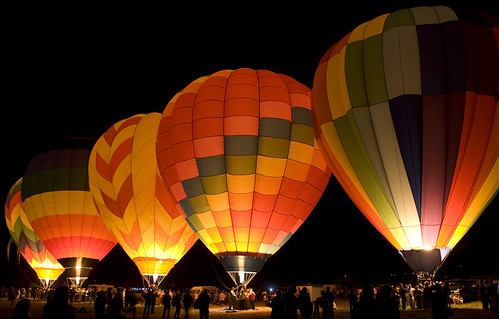
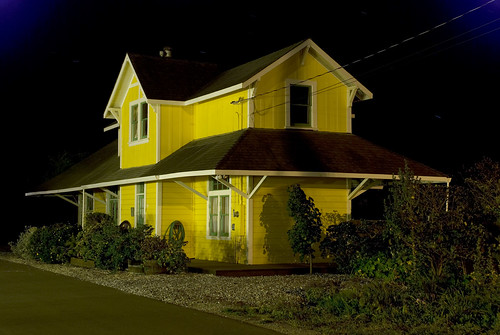
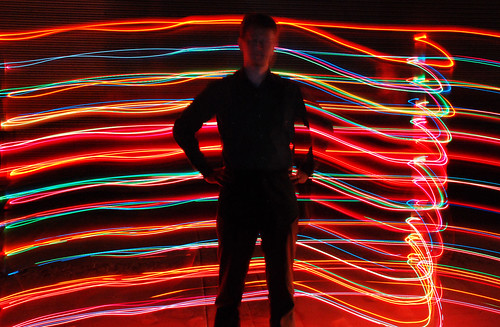
Low-key lighting is a style of lighting for photography, film or television. It attempts to create a chiaroscuro effect. In traditional photographic lighting, three-point lighting uses a key light, a fill light, and a back light for even illumination. Low-key lighting requires only one key light, optionally controlled with a fill light or a simple reflector.

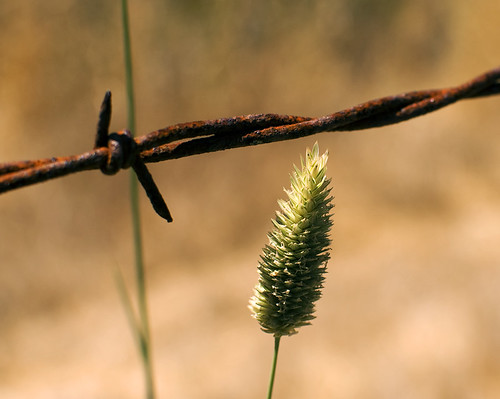
Low key light accentuates the contours of an object by throwing areas into shade while a fill light or reflector may illuminate the shadow areas to control contrast. The relative strength of key-to-fill, known as the lighting ratio, can be measured using a light meter. Low key lighting has a higher lighting ratio, e.g. 8:1, than high key lighting, which can approach 1:1.

The term "low key" is used in cinematography to refer to any scene with a high lighting ratio, especially if there is a predominance of shadowy areas. It tends to heighten the sense of alienation felt by the viewer, hence is commonly used in film noir and horror genres.


I always understood the term in a venacular kind of way, meaning a kind of dark environment (a jazz club immediately comes to mind), but when I took on a recent project put forth at Utata, this is the first picture I entered.

A bit rusty

The project, entitled "Iron Photogrpher" to include a flower, something rusty and low key lighting. I felt the picture met 2 of the 3 criteria and I underexposed to try to meet the 3rd.

Placed alongside the other submitted pictures, my photo pops out much lighter then the others. So I thought deeper about the term and realized that "low key" is probably a technical term that I have given little thought to. How often have I seen "key grip" in the credits of a movie and not taken the time to look up what it means.

The Wikipedia definition actually and briefly explains normal photographic lighting as having 3 considerations, a "key" light being the most important (the "key" lighting illuminating the most important feature of the subject), a fill light to reduce contrast and a back light to further even out the shadows. Low key can result when you remove the fill and back lighting. It also suggests the "chiaroscuro effect" which defines a large contrast between light and dark throughout the entire picture.

An image search on Google shows many low key examples. And my image still appears too light.

I was thinking that my photo has only one light source, the sun, but the problem arises as the sun is reflected off the grass in the background, a backlight if you will that distracts from the contrast within the subjects, that is if you are aiming for "low key".

So, I assume at this point that the pictures fails the 3rd criteria of low key lighting as is generally accepted and I need to try again. Maybe this can be salvaged using Photoshop to alter the background. Maybe an off camera flash, controlling the ambient light of the background with a fast shutter speed would accomplish the feat.

Maybe the pictured failed but, FTW, the reason I impose projects on myself is to incite me to shoot and hopefully learn somethng I did not know before.

Thursday, September 3, 2009

Full Moon + Great Weather = Night Photography

This is a good time for night photography. The moon is full, the skies are relatively clear and the temperature is not too cold.

Old House on Railroad Ave - Half Moon Bay After Dark

Here are a few web pages with tips for photographing the moon itself.

http://home.hiwaay.net/~krcool/Astro/moon/howtophoto/
http://www.timeanddate.com/worldclock/moonset-moonrise-photography.html
http://digital-photography-school.com/moon-photography-made-simple

And on Friday September 4, the rare event of the full moon setting just as the sun rises allows you to shoot a low moon with your choice of foreground illuminated by that rising sun. Getting out of bed that early on Friday is good practice for the upcoming Reno Balloon Races.

Moonlight provides a great opportunity to take unusual pictures of common objects. Get your tripod and remote shutter cable out, drag along a partner and find something to take long exposure shots of. Old cars and ancient architecture are favorites. Bring along some colored lights and a flash and try some light painting.

It's a holiday weekend and many of you have an extra day to play with, so why not give it a shot?

Monday, August 31, 2009

Andrew Zuckerman Photographs Wisdom


Last year, Andrew Zuckerman published a book of portraits and interviews with 51 iconic people over the age of 65 entitled Wisdom. Visit the web site to not only get an over view of this work but also to study an amazing "Making Of" video that shows the studio setup required to obtain the consistent look of the portraits. From the photographer's point of view, the amount of equipment that was hauled around the world and the lighting setups are worth seeing.

Saturday, August 29, 2009

Tod Dickow on tenor sax - Shot of the day from last month

We are going to see John Worley play at the Hedley Club and Tod Dickow is sitting in. Then I remembered that I scored a few good shots of him last month at Gordon Biersch playing with Fasmania. The band plays in the back alley in the evening with a black net stretched across as a ceiling. This usually presents quite the challenge using the 70-300 f4/5.6 lens, needing to crank the ISO to 3200 on my D80. All things considered, this shot came out fairly good. I like that I caught the Gordon Biersch logo behind him. A larger depth of field might have brought the sign into focus but, I needed a f5.6 just to get 1/60th of a second shutter speed. If they would only remain perfectly still while playing!

Todd Dickow

Saturday, August 22, 2009

Riding into the Sunset

My picture of the day is a man on a bike riding through Quarry Lakes park in Fremont, California, a relatively new park developed from an old gravel quarry.

Riding into the Sunset

Wednesday, August 19, 2009

10 Default Camera Settings I learned the hard way

Too often, I leave the settings on my camera to whatever the last shoot or picture required and then find that a day or 2 later, those settings are not appropriate for the next shoot. Many of my pictures are spontaneous action shots and do not allow much time to check the settings, let alone frame and focus. Even when I have the time, it is easy to forget (my mind is like a seive) one or more important controls that could be set to take a better picture. So borrowing from many other photographer's suggestions, this is a list of 10 default camera settings for my Nikon D80 that I review before I leave the house.

ISO = 100
Auto Focus = On
Autofocus = Continuous
VR = On and Normal
Camera Mode = Auto
Picture Quality = RAW
White balance = Auto
Metering = Matrix
Battery = Charged
Card = Formatted

ISO = 100 - This is a killer. Using the lenses I own, I often must crank the ISO to get decent exposure. Photographing musicians in available light is tough as are action shots of surfers with my 70 -300 f/4.5-5.6 lens. If I forget to reset the ISO back to 100, I later find the nice landscape pictures I took to be very noisy at ISO 3200.

Auto Focus = on - As my eyes get worse, I depend more and more on autofocus. I sometimes shut this off after getting the proper mid-air point of focus when anticipating a critter to walk or fly into that space. Forget this and you will waste a few precious shots later when you are trying to shoot anything else. It is also a good idea to occasionally check that the diopter setting in the view finder is adjusted to your vision.

Autofocus = Continuous Servo - Often, for me, quick grab shots are of moving targets so my default is Continuous Servo (AF-C). Hitting the AF button twice will easily take me to Single Servo (AF-S) if I want to lock focus.

VR = On and normal - For lenses equipmented with VR, the majority of my shots are handheld, but when taking long exposures on a tripod, Nikon recommends shutting VR off. The penalty for forgetting to turn this back on is blurry long distance shots when you are back to shooting handheld. I rarely touch the normal/active switch, but it can be moved and normal is my default. You might use Active when shooting from a moving car, but I am usually driving and not taking pictures. It is right next to the VR on/off switch, so check it while you are there.

Camera Mode = Auto - I usually shoot in Aperture or Shutter priority modes and sometimes in Manual and one or the other may not be right for an instant grab shot. So, my defalut setting is Auto. I may take a quick shot in auto, review the meter settings and then move to a priority mode from there.

Picture Quality = RAW - It is more work, but I need all the help (and resolution) I can get, so I shoot in RAW. There are times when I want to display the pictures quickly to a client. I will then shoot RAW + JPEG. Forget to reset this and it greatly reduces storage space. I may also shoot in JPEG only when using burst mode for action shots and need more buffer space. 5 or 6 RAW shots will fill the buffer and may cause me to miss the best shot in a series. Forget to go back to RAW and you lose resolution and many other controls (like the ability to change white balance) when you need it.

White Balance = Auto - Another killer setting if wrong. It is not difficult to hit the WB button and turn the dial thinking you are changing the ISO and end up shooting daylight pictures with a Tungsten White Balance and never notice this until you are back home reviewing pictures. At least I think that is what happened. This is where shooting in RAW mode helped recover some shots.

Metering = Matrix - Unless I specifically want spot metering for a shot, I default to Matrix Metering. I am still studying when best to change this setting.

Battery = charged - This seems silly but especially when taking long exposure pictures, you can never have too many fully charged batteries. You will not be happy driving to that spot and carrying all your gear down the goat path to the beach in the dark and running out of power after 5 shots. Brutal. Another thing to consider, Rick Sammon says that low batteries operate at higher temperatures which may affect the color balance in the image sensor.

Card = formatted - I try to start a shoot with an empty card. there is nothing like running out of memory and having to delete selected shots from a previous shoot and wondering if you had already downloaded them. When you get home, download the pictures, then back them up to a second drive and then (and only then) format the card. Formatting not only deletes the pictures but cleans all the bad bits out and provides maximum storage availability.

So, who says that digital cameras make taking pictures easier then ever. In the old days, after loading the film, you only thought of aperture, shutter speed and focus. Now there are dozens of buttons, menus and sub menus that can make your day or cause you grief. The settings I cover here are easy to get at and change (or mess up). I am not even talking about custom settings, deep within the menu dungeon. See your Thom Hogan guide for those settings.

I have suffered from every one of these setting failures, sometimes more then one at a time. So, I have written them down on a piece of paper and put them in the clear window on my camera bag in an attempt to minimize the damage and just maybe get some better pictures. These may not be your default settings, but they are all good things to think about before leaving for that shoot and looking unprepared. The best time to check your settings just might be when you get home, while the pictures are downloading to your PC.

Sunday, August 16, 2009

Picture of the day

Frittilary Butterfly (?)

I cannot postively identify this butterfly or flower which I found along the Merced River just east of Mariposa, but it is still my picture of the day.

Wednesday, August 12, 2009

Minus Tides

In the last workshop, we talked of photo opportunities in our backyard, one of which occurs when there is a “minus tide”. Essentially, a minus tide is a relatively rare, very low ocean water level condition that exposes a large amount of reef or ocean bottom. The coast here has a vast amount of shallow reef that, at a very low tide, traps many marine animals and exposes underwater plant life not normally seen while walking on the beach during regular tides.

I found this more technical explanation on the internet:

Jeff Renner
What's a minus tide?
A minus tide, also sometimes called a negative tide, is an unusually low tide. Tide 'heights' are referenced to a base level set as zero. This level, called the 'datum', is the same level used to reference water depths on NOAA navigational charts.

Usually, low tides still remain a bit above zero, often a foot or two above. But the swing from high tide to low tide levels is greatest when the sun and moon are either on exact opposite sides of the earth, or especially when they're on the same side of the earth. This corresponds to a full or a 'new' moon. The gravitational 'tug' by both the sun and moon pull water toward them. As the earth rotates under the oceans, high tides occur when that part of the earth is facing either the moon or sun (or both). Low tides occur about six hours later, when the earth has turned ninety degrees away from either of those 'bulges' of water.


Sunflower Sea Star 1
Sunflower Sea Star

This is indeed a photo opportunity to capture a wide variety of sea life provided the light is right and you are very careful with your equipment. Of course, you must consider the possibility of dropping your camera in the water. Even if the strap is securely around your neck, the rocks are slippery and if you fall in, your camera is going with you. These are things probably obvious to you but did not occur to me until I got out there for the first time.

But, if you are adventurous and except that risk, here are a few tips.
- Water proof boots help you get around easier and give you a bit more confidence.
- This is a good place to experiment with a polarizing filter which can reduce reflections on the surface of the water and provide better photographic access.
- Polarized sunglasses will also help your vision.
- Some kind of a reflector can be used to illuminate the critters hiding in the cracks or provide more direct light when the sun is low.
- I find a tripod to be a hindrance but you may want to try one if the lighting is poor.

When are these tides? Well, there are 2 low tides every 24 hours, but the times vary. You just need to know what time they happen and how low they will go. And you don't necessarily need to wait for an absolute minus tide. Look for any tide near 0 and take a walk to the beach with your camera.

Click here to go to the daily tide chart adjusted for Half Moon Bay. The chart shows the tides 2 days at a time. Scroll down to find more search options and a link for the entire year. I see that that the minus tides for August and September will mostly be between 1am and 5am, when they do occur. October and November have some low tides on some late afternoons. The first week of December is looking good for some -1.50 foot tides.

Check out photos others have taken. Click here to go to Flickr pictures tagged with the words “fitzgerald and marine” which show many pictures from the Fitzgerald Marine Preserve in Moss Beach. The preserve is easily accessed and very popular during these low tides.

Click here to go to a tide pool group in Flickr.

The Half Moon Bay Review posted an article about the Fitzgerald Marine Preserve and how it recently gained enhanced protection status, a good thing with the state park closings looming over our heads. Click here to read it.

Well, that should keep you busy for a bit. Have fun and take some pictures!

Tuesday, August 11, 2009

Princeton Art Walk Pictures

Follow this link to the gallery of pictures we took at the Princeton Art Walk this past Saturday. This is a most unusual event put on by the artist community of Half Moon Bay and the Coastside. Watch for future happenings.

Princeton Art walk Light drawing session 8.8.09

Friday, August 7, 2009

Princeton Art Walk - Saturday, August 8

Lori and I will be performing Light Drawing at the Princeton Art Walk tomorrow. This is in Princeton Harbor, Half Moon Bay, CA, starting at 7pm. This is a free and organic event in which artist's open their studios and homes to an evolving display of interactive art. Most activities will be up and down Harvard Street. Look for us after dark to be projecting near real time light drawings on the sides of buildings.

Princeton Art Walk Saturday 8.8.2009

For more details, see this article in the Half Moon Bay Review and this PDF document for the schedule of events.

See you there!

Sunday, August 2, 2009

Golden Gate Picture of the day

This was taken 2 weeks ago and is my first attempt at the mature subject of the Golden Gate Bridge peeking out of the fog. Taken from the Marin Headlands, be prepared to sit around waiting for the right conditions. Bring a book or load the iPod with a collection of photography podcasts. And be prepared for the cold and wind. Also, the fog can move very fast and the picture can be gone in the time it takes you to get out of the car and focus your camera. I did a fair amount of level correction in Photoshop and a little red saturation to get the effect I was looking for. Checking the web cams (see the link in the right column) can help survey the conditions which may change drastically by the time you get there.

First GG Bridge vs Fog photo

Saturday, August 1, 2009

Hawk at Redondo Beach

Is this a young redtail hawk? He was fairly big and his tail was not red. Anyway, that is my picture of the day.

Hawk at Redondo Beach

Friday, July 31, 2009

Picture of the Day


Just driving down Highway 1 and noticed the irrigation and Johnson House in harmonic convergence. Click the picture for a larger view.

Wednesday, July 29, 2009

About Flickr


Our last photography workshop discussed the online photo hosting site, Flickr and here are the notes I prepared:

In addition to hosting pictures from photographers around the world, Flickr also functions as an online community and a social networking site and can be used to meet other photographers that share your interests. Keep in mind that Flickr’s primary function is to display your pictures and you can choose what others see or how much you interact with anyone else. In short, it is nothing like Facebook, no one is bugging you to be their friend and there are no ads when viewing your pictures, even for the free accounts. There is one ad on the free account when you go to your Flickr home page, but it is small.

According to Wikipedia, as of June, 2009, Flickr hosts 3.6 billion pictures. It was started by Ludicor in Canada in 2004 and bought by Yahoo in 2005. At that time, all content was moved to the United States and is now subject to US laws. It is currently the most popular photo hosting site.

There are both free and Pro accounts available. The free account limits your picture upload to 100 megabytes a month. The Pro account cost $25 for a year and allows you unlimited uploads. You can upload video, all accounts are limited to 90 seconds for each movie and pro accounts may upload High Definition video.

A note on the upload limit – if you have a free account, do not directly download pictures from your 10 megapixel camera into Flickr. Learn to use software to reduce your image files to a much smaller size while retaining picture quality. This will allow you to upload many more pictures taking full advantage of your free account. And select only your best pictures to upload. Leave the blurred and duplicate pictures out. You wouldn’t put those blurred pictures in your photo album.

A Yahoo ID is required to join. If you do not have a Yahoo ID, Flickr makes it easy for you to complete the form to get one.

Flickr is used by amateur and professional photographers as a quick and easy way to share their work with friends, family and clients. Bloggers use it as an easy place to store photos to use on their blogs and to allow others to use for web content or printing.

I find Flickr very easy to use and configure to my specifications. You control all privacy settings for photos, whether the general public can see them or just friends and family who are members. You can send guest passes to non members to see pictures you listed as private. You have some control over how your gallery appears to others. You can organize your photos into sets and collections. And there is plenty of assistance provided by Flickr to help you get the most out of your page.

Censorship (what you see) defaults to the strictest level, suitable for minors. You can adjust what you allow yourself to view from there.

There are few restrictions to what people can post. This is regulated only by the country from which you are viewing. Germany and China have very strict restrictions on what their citizens may view on Flickr.

Beyond publishing my photos, I find real value viewing the work of others. If you seek to improve your photography, looking at and analyzing other photos is an excellent way to learn. Some people follow their own course and prefer not to be influenced by other work. More power to them. I find other work very interesting, educational and inspiring and find Flickr is an excellent source for help and ideas.

Groups – Search out groups within Flickr, there are thousands of them, each with a specific theme in mind and thousands of people contribute to these groups everyday. If you need inspiration or want to learn a new technique, visit a group with a theme that interests you. You can view the photos by selecting from thumbnails or run a slideshow of the entire pool. Again, looking at and evaluating other’s work is a great way to further your abilities.

Some great groups to visit are “The Commons” and “Explore”. The Commons hosts photos with no known copyright restrictions and is filled with pictures from the Library of Congress, the Smithsonian Institute and many international libraries, museums and colleges. Explore hosts “most linked to” and “most viewed pictures” and represents an amazing collection of random work from around the world. I also enjoy a group called “Light Junkies”, a collection of light drawing and long exposure photography. Use the search engine at the top of the page to locate your interests.

The Commons is here: http://www.flickr.com/commons/
Explore is here: http://www.flickr.com/explore/
Light Junkies is here: http://www.flickr.com/groups/lightjunkies/
Here is one for the Golden Gate Bridge: http://www.flickr.com/groups/ggb/

Interact - You can comment or add overlay notes on any picture which the owner allows comments. You can join groups, add your photos, join in on discussions in each group’s forums and receive feedback on your pictures. Tag your photos with key words to help you sort through your photos and to help others discover you too. Commenting and receiving feedback can enhance everyone’s experience and provide valuable insight.

Protect Yourself – You knew it sounded too good to be true, but actually, it’s not so bad. There are a few things you should consider when you post pictures online. Posted pictures can be copied. Every digital picture contains data such as when the picture was taken and the camera settings. It can hold your name and contact information to protect your copyright privileges. You should make sure that your contact information is embedded in each photo you post. This gives you some form of copyright protection and gives others the ability to contact you if needed. The only way to completely be sure your work is never copied is to never post it. So, you need a level of trust to participate in the fun.

Obey the rules – Be aware that Flickr maintains the right to delete your account and all the pictures at any time for any reason. There have been a few complaints and disputes but there are usually facts missing from what I have read. These problems are rare. The rules are not unreasonable. Stay in the boundaries and keep copies of your pictures on your own computer.

Spend time setting up your Flickr profile. There are some copyright settings there too. That is where you determine who can see your pictures and if they can comment on them.

Flickr makes it easy to view various sizes of your picture, embed them into web pages and share them via email. It goes on and on and new features are instituted all the time. I use Flickr everyday, enjoy the interaction, learn from others and (until I find something grossly wrong) recommend it to everyone. Have Fun!

Reference: Derek Story produced a podcast (#175) on the Digitalstory website entitled “Top 10 Flickr tips”. Check it out.

Monday, July 27, 2009

SF Bay Bird Observatory Photo Contest


Red-winged Blackbirds - PHOTO BY GARRETT LAU

The San Francisco Bay Bird Obsevatory holds a photo contest as part of their fund raising activities and the submissions period starts today with a deadline of October 9.

"The San Francisco Bay Bird Observatory is dedicated to the conservation of birds and their habitats through science and outreach, and to contributing to informed resource management decisions in the San Francisco Bay Area."
Prizes include bird photography workshops with Oliver Klinkworth or Bruce Finacchio and gift certificates from Borrowlenses.

Read all the details on their web site: http://www.sfbbo.org/support/clickoff/clickoff.php

Sunday, July 26, 2009

Surfers and Rodeos

It was a busy 3 days and a good chance to practice sport action shooting. Huge swells hit the bay area and the surfers hit the water. I caught some shots at Steamer Lane on Thursday, Half Moon Bay on Friday and then went to the Driscoll Ranch Rodeo on Saturday.

Bronco Ridin'


Wednesday, July 22, 2009

Web Cam Roundup - San Francisco Bay Area

There are a wide variety of photogenic sites around the San Francisco bay area, each with their own micro climate and access challenges. The fog may be in or out, it may be cloudy in one area and sunny just a mile away, the surf may be up or flat, the traffic to that site may be insurmountable. Before I drive or hike somewhere to take pictures, I often check the conditions via the many web cams located around the bay area. Here is a list of active web cams I find useful. Some cameras allow you to take control to pan and zoom the scene.

SanFranciscoBay.com has the most complete collection I have found to-date.

SFGate and CBS5.com have their own similar collections.

But there are more:

Controlable "Alcatraz" cam which is actually from Sausalito.

SurfLine.com links to all available cameras pointed at the ocean in addition to listing surf conditions. Explore this site to find reports and surf cams from around the world. this link takes you to Central California.


Hi-Def San Francisco (pictured above) monitors the bay and skyline from Sausalito, tracking ships and offering time lapse movies of interesting days.

SamCam at Sam's Chowder House in Princeton Harbor will give you an idea of the weather conditions in Half Moon Bay.

For traffic conditions, I check SFGate's traffic page and 511.org for a live map of drive time and highway speeds.

I also monitor the Bay Area Air Quality Management District looking for clues to air clarity.

That's a start. I'll list more as I find them and l'll link this post for easy access on the side of this blog.

Happy viewing!

Monday, July 20, 2009

Worldwide Photo Walk 2009

I participated in Scott Kelby's Worldwide Photo Walk this past weekend. Over 30,000 people participated around the world.

A photo walk is a group of photographers getting together in one place, ambling through a town, and photographing anything that moves or doesn't, basically terrorizing the natives. You discuss equipment, techniques, composition or anything you can get them to talk about. Just watching what they photograph is a learning experience. I wholeheartedly endorse this annual event.

View images from the walk that I posted on Flickr here.
View the San Francisco North Beach Walk group photos here.
And view walk photos from around the world here.


Saturday, July 18, 2009

Photo Op - Bay Area Fog


I've been searching for clues on getting those spectacular shots of buildings, bridges and sunsets peeking through the San Francisco bay area fog. Here is an article by Tom Steinstra from DateBook's Fog Week on the SFGate web site that discusses opportunities for catching those views. In addition to their mountain top suggestions, read the comments for a few more. (Warning: some colorful and angry commentary.)

http://www.sfgate.com/cgi-bin/article.cgi?f=/c/a/2009/07/16/SP6618ORUH.DTL&type=living

"For the totally lazy, or if you're traveling, you can often get above the fog shots, up to the minute, from the camera at Lawrence hall of Science above Berkeley. http://sv.berkeley.edu/view/"

And 2 other useful webcams I picked up from fellow photogs at the World Wide Web Photo Walk:

Hi-Def San Francisco - is a cam located in Sausalito pointed at San Francisco displaying up to 1080 resolution and provided by CloudView Photography. This is the best SF cam I have found to date.

CBS5.com provides many traffic and bay area site cam links from Ocean Beach to Heavenly Valley Ski Resort.

Friday, July 17, 2009

InStep Quartet Photo Shoot - Part3

What can possiblie go wrong?

There were a few mishaps but not too much went wrong on this photo shoot. Let's include the things that could have gone wrong in this list.

- Be on time, actually be early. I was on time but I should have gotten to the site much earlier (or gone days before) to scout locations. Why not become familiar with appropriate photogenic locations in your area as well as sun direction at various times of the day. Spending time scouting locations saves time for your clients. In this field, I would rather wait for my clients then have them wait for me.

- Equipment can break unexpectedly. I was prepared for shooting outside with a stand and umbrella reflector by bringing weights to stabilize the stand. An umbrella can take off like a kite in a moderate wind, taking your expensive lighting with it. What I didn't expect is for some parts to fall out of the center part of the stand allowing it to spin freely like a weather vane. We used a business card stuck in the gap to finish the shoot. Do not let unexpected problems put you off your game. Fix it or have spares and move on.

- Get permission. Having permission from property owners is a plus. If not, expect security to make no allowances for trespassing. If confronted, be polite and move along. We were setting up for a great shot on these blue metal stairs when the man happened along. We did not get the shot.


- Pay attention to what is in the frame. This takes practice when time is limited. You are trying to quickly get as many shots from as many angles as you can. Taking time to analyze the background will save you time in post. We settled on a location with cool looking doors but there were also many windows around. Reviewing the pictures, I find the windows fairly busy with distractions reflected in the glass, such as cars, picnic tables, the back of the model's heads and worst of all, the flash setup. I might be able to remove that rodent trap in Photoshop but glass panes are not so easy to reconstruct. Pay attention and avoid unwanted objects when you shoot. Shooting tighter can help or move to sharper angles but if it is not working, say so, take charge and move to another location. It is also important for you to pay attention to the models. They cannot see themselves as well as you can. Is their clothing or their hair out of place? Are the props blocking anything important? Pay attention to these things, move items and comment when needed. I personally do not touch the models.

- Flash needs to recharge. Of course the flash needs to recharge. I knew that. And the higher power you shoot, the longer the recharge time. This is a timing issue that takes practice and experience. The flash did not fire for some of my best shots. Bright sun and bracketed settings did save the day for some.

Conclusion - Look at everything I learned. This was a successful shoot for me and most importantly, I hope the quartet like the pictures. It is really for and about the client. Just make sure what you can provide is fully understood by all concerned ahead of time. Then go a have fun!

The InStep Quartet is a professional, high quality and multi-genre San Francisco bay area based string quartet. Read more about them on their web site.


Part 1 - Part 2

Wednesday, July 15, 2009

InStep Quartet Photo Shoot - Part 2


The Flash Rig

I want to say that the InStep Quartet are lovely people, patient, fun and appreciative. We had a great time shooting these pictures to our mutual benefit.

We decided to shoot the pictures at the now closed Alameda Navy Base for some rustic (and rusty) atmosphere. I expected bright sun and figured on shooting in whatever shade we could find at high noon. The flash would help even out the lighting. I was also hoping for some clouds and wanted to use the flash to control the ambient sky light in an artsy and dramatic way. There was not a single cloud in the sky, just bright, hot sun. The rig did work but was a challenge get everything right. More on that later.

I am in the market for flash equipment for studio and location work. Renting is a great way to get experience and field test expensive equipment before you buy. Fortunately, the San Francisco bay area hosts the photography rental company "Borrow Lenses". They are not far from my home and I was able to rent the lighting equipment I needed for this shoot on Friday, practice with it over the weekend, shoot the quartet on Monday morning and return it before 6pm.

The company is easy to work with and I appreciate that they were able to adapt to my needs. Nikon equipment is currently very popular so it is a good idea to reserve your equipment ahead of time, easily done on their web site. You also have the option of buying damage insurance.

I rented a Nikon SB900 Speedlight flash (ask for the manual and the color filters), 2 Pocket Wizards, a 13' light stand (the only size they rent at that time), a 48" reflective umbrella (again, the only size they rent) and a Gary Fong Lightsphere (which I never used). Batteries are your responsibility. There were none in the Pocket Wizards and the SB900 ran out after a few uses. There was no indication that an umbrella adapter was included or available. I called to talk about this and they noticed it before I was able to ask. So they ran out and bought a few (complete with brass monkey and cold shoe) and included one at no cost.

I had the weekend to experiment, scaring the bird and the wife with umbrellas and flashing lights in the house, referring back to Zack Aria's One Light Workshop video several times (mentioned in Part 1).

If the equipment is new to you, practice opening and closing everything. Take things apart and put them back together. Ask for the manual for everything you rent and read through it. Practice going through the menus on the flash. The idea is that you do not want to take time learning how to setup the stand or configuring the flash during the shoot. I discovered ahead of time that the flash does not lock into the cold shoe and the set screw can come loose with the flash falling out. I secured it with a velcro strap before the shoot and had no problems.

I totally neglected to take a picture of the setup for posterity, so dumb.

I did take the opportunity to try utilizing the flash for my Backyard Bird Photography project. Results? Well, let's just say you learn more from failure. The goal was to stop the action of birds in flight. I need more research for the proper setup to accomplish this. I did observe that, for the record, birds are not concerned with the flash and this was setup (without the umbrella) very close to the bird feeder. But that project is a subject for another post.

The InStep Quartet is a professional, high quality and multi-genre San Francisco bay area string quartet. Read more about them on their web site.

Next: Part 3 - What Could Possiblie Go Wrong?
Part 1 - Part 3

Tuesday, July 14, 2009

InStep Quartet Photo Shoot - Part 1

Yesterday, I had the opportunity to shoot publicity photos for some friends and gained valuable experience and knowledge. This is a new chapter in my photography adventure which I jump into, whole heartedly with both feet. But it takes a bit of practice...


Let me first say that I shoot live musicians whenever and wherever I have the opportunity. And I play jazz myself, so I have some experience at the challenge of getting good angles. But a scheduled photo shoot requires a more deliberate approach. This post will document my thought process and lessons learned.

To prepare, I spent the time required to thoroughly watch the Zack Arias DVD, One Light Workshop. Keeping the instructional simple by using only one flash unit for all examples, Zack clearly demonstrates how to master the light in any setting using manual control over shutter speed, aperture, ISO and flash power. If you are confused at all about flash photography, I highly recommend this 4 hour DVD set. Check out a short trailer from the video and a review by photo blogger David Cross on Zack's web site for much more detail: http://www.onelightworkshop.com/page5/page5.html

Next, understanding how the client will use the pictures and what type of setting they desire will help determine the equipment you will need. The clients chose the defunct Alameda Navy base as a backdrop with all it's industrial and decaying atmosphere. I thought it best to shoot in the shade wherever possible to minimize stark shadows and squinting and decided on a simple Nikon SB 900 speed flash, a reflective umbrella, a light stand and a pair of pocket wizards for remote control might help even out the light and be easy to deal with. A larger flash and a larger light box would have provided a better light source for a 4 person shoot but since I do not own this equipment and need to rent it, I considered the following in my choice:

- we had a short 2.5 hours, beginning to end for the shoot, including location scouting, discussion, and picture review
- I do not have an assistant and so wanted to keep the rig as portable as possible
- I wanted to keep the price down
- I am considering buying these items and wanted to test their limits in the field

The InStep Quartet is a professional, high quality and multi-genre San Francisco bay area based string quartet. Read more about them on their web site.

Next - Part 2: Renting and Testing the Flash Rig


Part 2 - Part 3

Monday, July 13, 2009

Nikon Rumors


As a Nikon user, I find the Nikon Rumors web site of interest. They search the world advertisements for hints about new and discontinued products. If you are in the market for new equipment, check out the Price Watch page for known best prices and suggestions for whether to buy or wait on evidence that new products are about to be introduced.