It is time I learned a lot more about on camera filters. Filters, by definition remove something from that which they are filtering. Camera filters remove somthing from the light entering your camera, maybe a color or the amount of light or blocking light coming from specific directions. I felt the need to get me some of these filters and the more I researched, the more products available (at many different prices) and the more information I found.
One good (online and free) primer that explains filter basics and then goes on to give brief descriptions of 2 dozen common filters and how they can compliment your photography can be found at:
http://www.digicamera.com/features/filterprimer/index.html
One way to narrow the choices is to think about what effects you are aiming for or consider a problem you just can't seem to overcome with the camera as is. I am looking to soften moving water in bright light and also reduce glare from shiny surfaces. From my reading, a neutral density (ND) filter should help with the former. It appears to block all colors equally hence blocking just the amount of light entering the camera. For the latter, a polarizing filter, specifically a circular polarizing filter sounds about right.
So an ND and a circular polarizing filter sound like a good start for my needs. Now, to determine which brand and quality to pony up for. People like Scott Bourne suggest bying the best, especially if you have expensive lenses. "Why put a cheap filter on an expensive lens?" He and Rick Sammon often comment about filters on their podcasts which can be found at http://photofocus.com/.
One last interesting fact is that no professional photographers seem to recommend a plain or UV filter just to protect the front of your lens as any extra glass will degrade your picture. Since I need all the help I can get, there are no UV filters on my cameras.
So, I will update this entry when I decide and buy some filters. More to come!
Saturday, September 19, 2009
Wednesday, September 16, 2009
First Stop Action Animation Video
This blog is all about learning photography and I have no problem showing "first attempts" even though I feel it is not my best work.
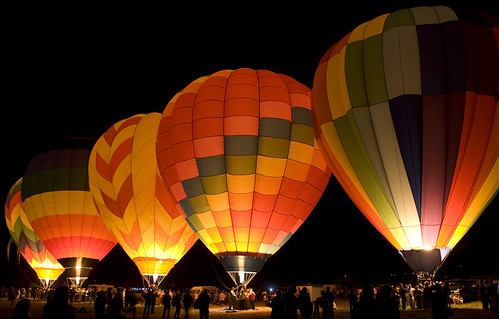
I took a series of about 200 pictures from a hill above the Reno Balloon Race and created a stop action video of the mass ascension. Click on the picture to go to the video.

Using Photoshop I created an action that adjusted levels, brightened, added contrast and resized the 200 pictures. I then imported them into Windows Movie Maker, configured a few things like setting each frame to display for 1/8 of a second and I experimented with several different quality settings. The Windows program was very easy to work with and is free as opposed to buying and learning Premiere. I have not looked at other video programs.
One improvement for this video would be to not move the camera between shots. The jumpiness is a bit annoying. The exposure changes too. I believe I left the mode at aperture priority as the sun was going in and out due to the clouds and it gets a little dark at the end. Setting the exposure and using manual might have helped. Not every frame is in focus either, at least in the beginning. I noticed that the auto focus changed as the balloons moved. After a few frames, I focused and then turned off the AF.
Another helpful hint would be to set the camera to take the pictures at a specific frequency. I had rented a D90 and could not easily figure this out when I needed to. I took the shots manually, counting to 10 when not much was happening and more frequent when the balloons were rising.
And there is no music! Maybe Yakkity Sax would fit.
All in all, it was a fun project that can still be improved on. And the lessons learned are most important!
Update: I neglected to include a useful web tutorial on stop action animation that was a big help to getting started:
http://www.wikihow.com/Create-a-Stop-Motion-Animation
I took a series of about 200 pictures from a hill above the Reno Balloon Race and created a stop action video of the mass ascension. Click on the picture to go to the video.
Using Photoshop I created an action that adjusted levels, brightened, added contrast and resized the 200 pictures. I then imported them into Windows Movie Maker, configured a few things like setting each frame to display for 1/8 of a second and I experimented with several different quality settings. The Windows program was very easy to work with and is free as opposed to buying and learning Premiere. I have not looked at other video programs.
One improvement for this video would be to not move the camera between shots. The jumpiness is a bit annoying. The exposure changes too. I believe I left the mode at aperture priority as the sun was going in and out due to the clouds and it gets a little dark at the end. Setting the exposure and using manual might have helped. Not every frame is in focus either, at least in the beginning. I noticed that the auto focus changed as the balloons moved. After a few frames, I focused and then turned off the AF.
Another helpful hint would be to set the camera to take the pictures at a specific frequency. I had rented a D90 and could not easily figure this out when I needed to. I took the shots manually, counting to 10 when not much was happening and more frequent when the balloons were rising.
And there is no music! Maybe Yakkity Sax would fit.
All in all, it was a fun project that can still be improved on. And the lessons learned are most important!
Update: I neglected to include a useful web tutorial on stop action animation that was a big help to getting started:
http://www.wikihow.com/Create-a-Stop-Motion-Animation
Monday, September 14, 2009
The Great Reno Balloon Race 2009
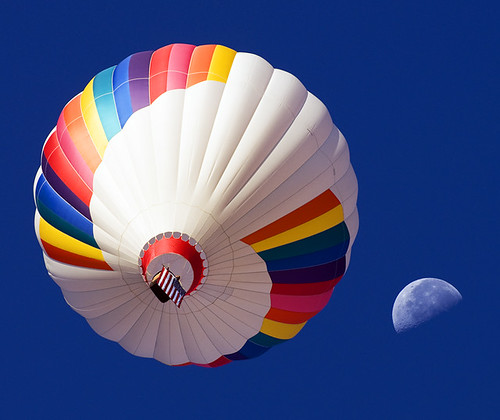
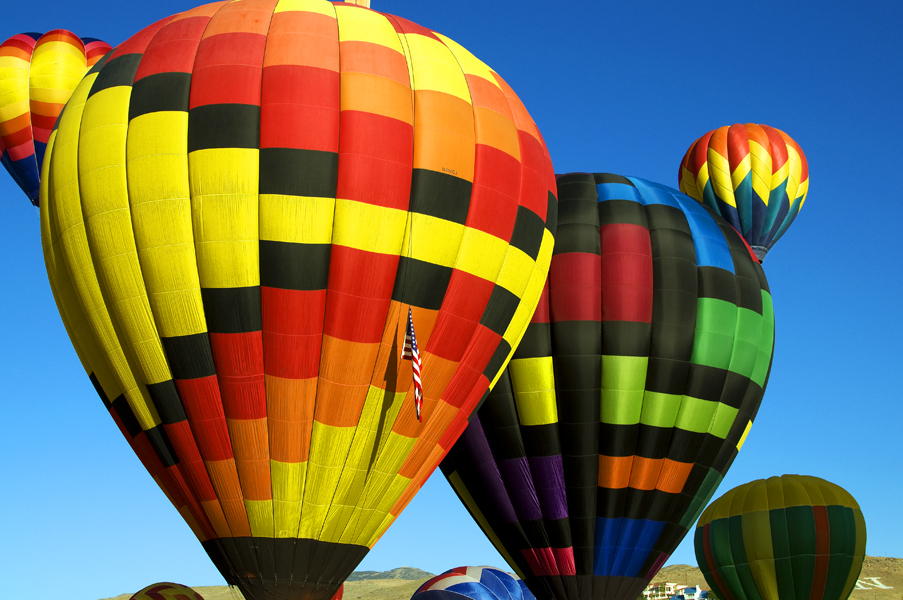
We just returned from 3 days at the Reno Balloon Race with nearly 3000 pictures and a few dozen videos. The question is this: what are the most efficient work flow solutions for reviewing, editing and posting the best pictures? I think that will be the subject of my next blog post. In the meantime, here are a few choice pixs. Click any see to the larger versions.
For more hot air balloons, my Flickr gallery is here and Lori's gallery is here.
For more hot air balloons, my Flickr gallery is here and Lori's gallery is here.
Thursday, September 10, 2009
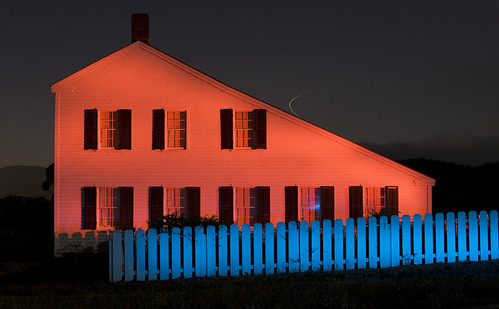
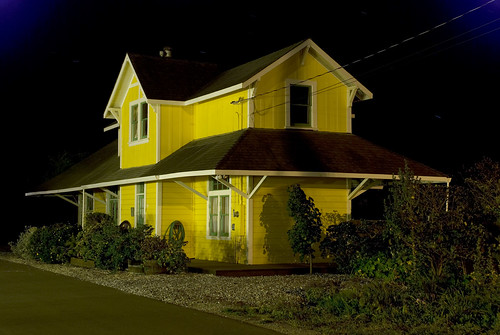
Light Painting the Johnston House
While searching for a light painting opportunity last weekend during the full moon, I noticed that the Johnston House in Half Moon Bay sat dark on it's hill. The house is normally lit by an intense white light and stands out clearly while driving highway 1 through town. Large and white, I took the opportunity to jazz it up a bit with a new spot light I recently purchased.
Monday, September 7, 2009
Low Key Lighting
What I learned today: a definition of low key lighting.
From Wikipedia:
I always understood the term in a venacular kind of way, meaning a kind of dark environment (a jazz club immediately comes to mind), but when I took on a recent project put forth at Utata, this is the first picture I entered.
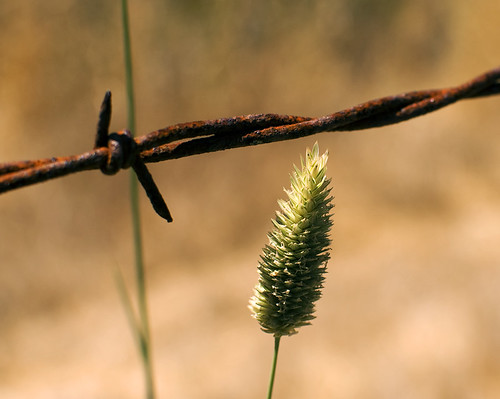
The project, entitled "Iron Photogrpher" to include a flower, something rusty and low key lighting. I felt the picture met 2 of the 3 criteria and I underexposed to try to meet the 3rd.
Placed alongside the other submitted pictures, my photo pops out much lighter then the others. So I thought deeper about the term and realized that "low key" is probably a technical term that I have given little thought to. How often have I seen "key grip" in the credits of a movie and not taken the time to look up what it means.
The Wikipedia definition actually and briefly explains normal photographic lighting as having 3 considerations, a "key" light being the most important (the "key" lighting illuminating the most important feature of the subject), a fill light to reduce contrast and a back light to further even out the shadows. Low key can result when you remove the fill and back lighting. It also suggests the "chiaroscuro effect" which defines a large contrast between light and dark throughout the entire picture.
An image search on Google shows many low key examples. And my image still appears too light.
I was thinking that my photo has only one light source, the sun, but the problem arises as the sun is reflected off the grass in the background, a backlight if you will that distracts from the contrast within the subjects, that is if you are aiming for "low key".
So, I assume at this point that the pictures fails the 3rd criteria of low key lighting as is generally accepted and I need to try again. Maybe this can be salvaged using Photoshop to alter the background. Maybe an off camera flash, controlling the ambient light of the background with a fast shutter speed would accomplish the feat.
Maybe the pictured failed but, FTW, the reason I impose projects on myself is to incite me to shoot and hopefully learn somethng I did not know before.
From Wikipedia:
Low-key lighting is a style of lighting for photography, film or television. It attempts to create a chiaroscuro effect. In traditional photographic lighting, three-point lighting uses a key light, a fill light, and a back light for even illumination. Low-key lighting requires only one key light, optionally controlled with a fill light or a simple reflector.
Low key light accentuates the contours of an object by throwing areas into shade while a fill light or reflector may illuminate the shadow areas to control contrast. The relative strength of key-to-fill, known as the lighting ratio, can be measured using a light meter. Low key lighting has a higher lighting ratio, e.g. 8:1, than high key lighting, which can approach 1:1.
The term "low key" is used in cinematography to refer to any scene with a high lighting ratio, especially if there is a predominance of shadowy areas. It tends to heighten the sense of alienation felt by the viewer, hence is commonly used in film noir and horror genres.
I always understood the term in a venacular kind of way, meaning a kind of dark environment (a jazz club immediately comes to mind), but when I took on a recent project put forth at Utata, this is the first picture I entered.
The project, entitled "Iron Photogrpher" to include a flower, something rusty and low key lighting. I felt the picture met 2 of the 3 criteria and I underexposed to try to meet the 3rd.
Placed alongside the other submitted pictures, my photo pops out much lighter then the others. So I thought deeper about the term and realized that "low key" is probably a technical term that I have given little thought to. How often have I seen "key grip" in the credits of a movie and not taken the time to look up what it means.
The Wikipedia definition actually and briefly explains normal photographic lighting as having 3 considerations, a "key" light being the most important (the "key" lighting illuminating the most important feature of the subject), a fill light to reduce contrast and a back light to further even out the shadows. Low key can result when you remove the fill and back lighting. It also suggests the "chiaroscuro effect" which defines a large contrast between light and dark throughout the entire picture.
An image search on Google shows many low key examples. And my image still appears too light.
I was thinking that my photo has only one light source, the sun, but the problem arises as the sun is reflected off the grass in the background, a backlight if you will that distracts from the contrast within the subjects, that is if you are aiming for "low key".
So, I assume at this point that the pictures fails the 3rd criteria of low key lighting as is generally accepted and I need to try again. Maybe this can be salvaged using Photoshop to alter the background. Maybe an off camera flash, controlling the ambient light of the background with a fast shutter speed would accomplish the feat.
Maybe the pictured failed but, FTW, the reason I impose projects on myself is to incite me to shoot and hopefully learn somethng I did not know before.
Thursday, September 3, 2009
Full Moon + Great Weather = Night Photography
This is a good time for night photography. The moon is full, the skies are relatively clear and the temperature is not too cold.
Here are a few web pages with tips for photographing the moon itself.
http://home.hiwaay.net/~krcool/Astro/moon/howtophoto/
http://www.timeanddate.com/worldclock/moonset-moonrise-photography.html
http://digital-photography-school.com/moon-photography-made-simple
And on Friday September 4, the rare event of the full moon setting just as the sun rises allows you to shoot a low moon with your choice of foreground illuminated by that rising sun. Getting out of bed that early on Friday is good practice for the upcoming Reno Balloon Races.
Moonlight provides a great opportunity to take unusual pictures of common objects. Get your tripod and remote shutter cable out, drag along a partner and find something to take long exposure shots of. Old cars and ancient architecture are favorites. Bring along some colored lights and a flash and try some light painting.
It's a holiday weekend and many of you have an extra day to play with, so why not give it a shot?
Subscribe to:
Posts (Atom)


